Ready to start a blog with ease? Quartz 4 is the perfect tool for the job! Follow my step-by-step tutorial to build your own, or dive into the Welcome to Quartz 4 documentation for even more features.
0. Before You Start
You will need
- A GitHub account
- A computer
- Network(a VPN may be required)
- Obsidian (Optional, but highly recommended for the best editing experience)
Have a look at my blog: Welcome to John Ferrel Blog
1. Set Up Environment
Install Git
https://git-scm.com/install/windows
Install Node.js
Node.js — Download Node.js®
For Windows, simply download the prebuilt installer.

Validate Installation
Open PowerShell or CMD:
git --version
node --version
npm --version
2. Set Up Quartz
Choose a directory where you want to create your blog, and right-click and select “Open in Terminal” or “Open PowerShell here”. Then,
git clone https://github.com/jackyzha0/quartz.git
cd quartz
npm i
npx quartz create
When prompted, select Empty Quartz, Shortest path(default).
Now, we are at the root path of quartz, which will be the default path in this tutorial.
Enter the sub folder content, and you will find index.md, which is the home page.
It’s highly recommended to use Obsidian and set the folder content as your vault.
3. Write Your First Post
---
title: Example Title
draft: false
tags:
  - example-tag
---

The rest of your content lives here. You can use **Markdown** here :)
4. Build and Preview Locally
Open quartz.config.ts
- change the
pageTitlefrompageTitle: "Quartz 4"topageTitle: "<Your Blog Name>".
Open quartz.layout.ts,
  footer: Component.Footer({
    links: {
      GitHub: "https://github.com/<Your GitHub Name>",
      // Friend Link(my blog)
      "John's Blog": "https://github.com/John-Ferrel",
    },
  }),
Run the command to build Blog locally
npx quartz build --serveOpen a web browser and visit http://localhost:8080/ to view it.
5. Set Up GitHub Repository
Create a new repository on GitHub.com. Do not initialize the new repository with README, license, or gitignore files.
 For a shorter domain, name the repository as
 <username>.github.io, which will be your Blog domain name.
Copy the remote repository URL, like https://github.com/<username>/<username>.github.io.git, which we’ll call REMOTE_URL.
Run the following commands in the root of your Quartz directory
git remote -v
git remote set-url origin <REMOTE-URL>
git remote add upstream https://github.com/jackyzha0/quartz.git
Upload your repository,
npx quartz sync --no-pull6. Hosting on GitHub Pages
In the root of your Quartz directory, create a new file at .github/workflows/deploy.yml.
name: Deploy Quartz site to GitHub Pages

on:
  push:
    branches:
      - v4

permissions:
  contents: read
  pages: write
  id-token: write

concurrency:
  group: "pages"
  cancel-in-progress: false

jobs:
  build:
    runs-on: ubuntu-22.04
    steps:
      - uses: actions/checkout@v4
        with:
          fetch-depth: 0 # Fetch all history for git info
      - uses: actions/setup-node@v4
        with:
          node-version: 22
      - name: Install Dependencies
        run: npm ci
      - name: Build Quartz
        run: npx quartz build
      - name: Upload artifact
        uses: actions/upload-pages-artifact@v3
        with:
          path: public

  deploy:
    needs: build
    environment:
      name: github-pages
      url: ${{ steps.deployment.outputs.page_url }}
    runs-on: ubuntu-latest
    steps:
      - name: Deploy to GitHub Pages
        id: deployment
        uses: actions/deploy-pages@v4
Then,
- Head to “Settings” tab of your own repository and in the sidebar, click “Pages”. Under “Source”, select “GitHub Actions”.
- Run the following command to commit your changes:
npx quartz syncThis should deploy your site to <username>.github.io.
7. Comments
Install giscus
Install it for your blog repository <username.github.io.
Head to “Settings” tab of your blog repository, scroll down to the “Features” section and select Discussions.
Open giscus and Enter <username>/<repository-name>, e.g.,
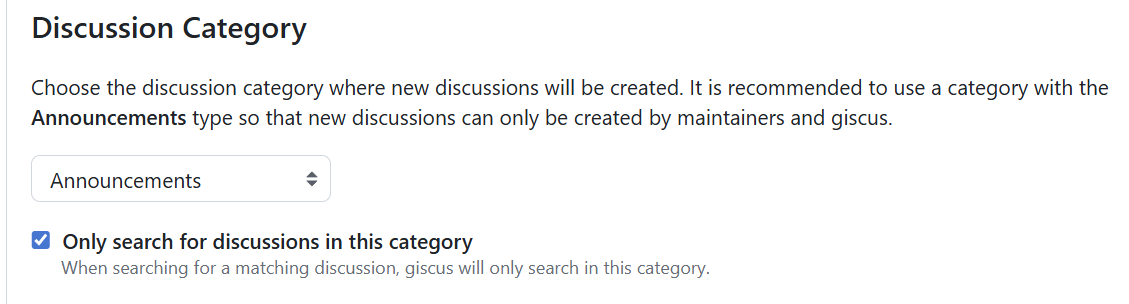
 Make sure you select
 Announcements for the Discussion category.
Giscus will then provide you with a block of configuration code:
<script src="https://giscus.app/client.js"
        data-repo="john-ferrel/john-ferrel.github.io"
        data-repo-id="R_kgDOQmdsNBbA"
        data-category="Announcements"
        data-category-id="DIC_kwDOQmNdfBbM4Czn4C"
        data-mapping="pathname"
        data-strict="0"
        data-reactions-enabled="1"
        data-emit-metadata="0"
        data-input-position="bottom"
        data-theme="preferred_color_scheme"
        data-lang="en"
        crossorigin="anonymous"
        async>
</script>
Open quartz.layout.ts, and edit the afterBody as follows:
afterBody: [
  Component.Comments({
    provider: 'giscus',
    options: {
      // from data-repo
      repo: 'john-ferrel/john-ferrel.github.io',
      // from data-repo-id
      repoId: 'R_kgDOQmdsNBbA',
      // from data-category
      category: 'Announcements',
      // from data-category-id
      categoryId: 'DIC_kwDOQmNdfBbM4Czn4C',

      lang: 'en'
    }
  }),
],
Sync:
npx quartz sync